

Your default printer is whichever device gets a print job the moment you hit Ctrl+P without picking a specific printer first. If you just added a new printer, switched offices, or noticed your documents keep landing on the wrong machine, changing that default takes less than a minute once you know where the setting lives. The steps differ slightly depending on your operating system and version, so this guide covers Windows 11, Windows 10, and Mac, along with the command line method and the fixes for when the setting refuses to save.
How to Change the Default Printer in Windows 11
Windows 11 moved printer settings out of the old Control Panel and into the Settings app, and it also added an automatic management feature that can quietly override whatever you choose. Here is the full process.
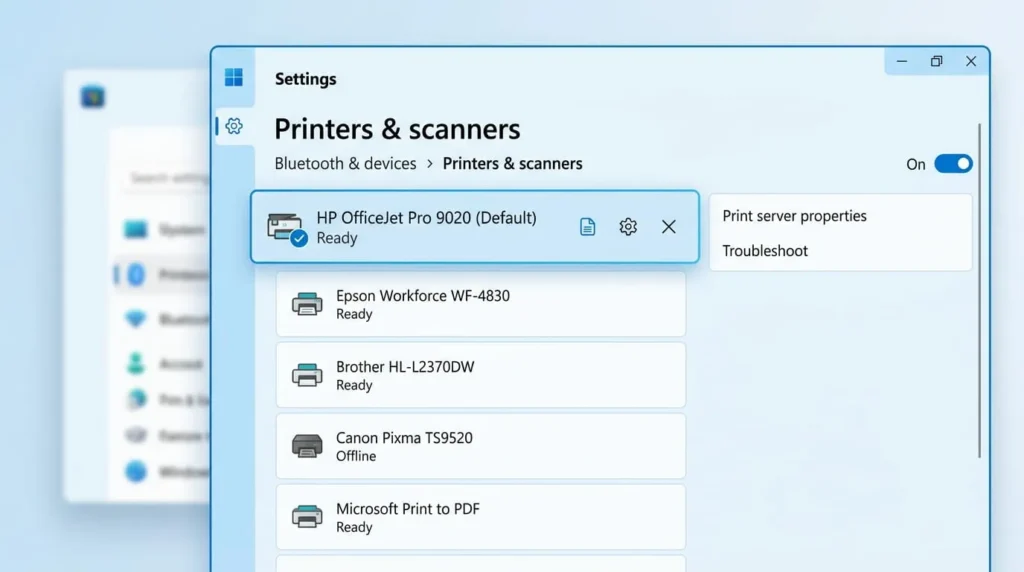
First, press Windows key + I to open Settings, then click Bluetooth & devices in the left sidebar, followed by Printers & scanners. This opens a list of every printer that has ever been installed or mapped to your PC, whether or not it is currently connected.
Scroll down to the section labeled Printer preferences and look for a toggle called Let Windows manage my default printer. Switch this to off. If you skip this step, Windows will keep resetting your default to whichever printer you used most recently, and the Set as default button will stay greyed out no matter which printer you click.
Once that toggle is off, click the printer you want to use as your default. A details panel expands beneath it. Select Set as default, and the word Default will appear under that printer’s name in the main list. The change takes effect immediately, no restart needed.
How to Change the Default Printer in Windows 10
Windows 10 uses a similar layout with slightly different wording. Open Settings, click Devices, then select Printers & scanners from the left menu.
Scroll down and you will see a checkbox rather than a toggle, labeled Let Windows manage my default printer. Uncheck it. Then click your preferred printer from the list above, click Manage, and choose Set as default on the page that opens.
If you would rather work from the classic interface, Windows 10 still supports the Control Panel route. Open Control Panel, select Devices and Printers, right-click the printer you want, and choose Set as default printer from the context menu. Both methods produce the same result, so use whichever interface you find faster.
Turning Off Automatic Default Printer Management
This single setting causes more confusion than any other part of the process. Both Windows 10 and 11 ship with automatic management turned on out of the box, which means Windows picks whatever printer you used last and quietly makes it the default, even if you set a different one manually an hour earlier.
This behavior is genuinely useful if you regularly bounce between a home printer and an office printer and want Windows to guess correctly most of the time. It becomes a problem the moment you have one printer you always want to use, because Windows will override your choice as soon as you print to something else even once, like a PDF printer or a network scanner that also registers as a print device.
Turning the feature off is the permanent fix. Once it is disabled, your chosen default stays put until you manually change it again, regardless of what else you print to in the meantime.
Changing the Default Printer from the Print Dialog Box
You do not always need to open Settings to switch printers. Inside almost any application, when you open the Print dialog (usually Ctrl+P), there is a dropdown menu showing every available printer. Selecting a different one there changes which printer that specific document goes to, but it does not change your system-wide default unless the app or the dialog includes an explicit “set as default” checkbox.
Some print dialogs, particularly in older desktop software, do include this option directly. If you see a box labeled something like “Set as default printer” near the printer dropdown, checking it before you print applies the change system-wide, saving you a trip to Settings.
How to Change the Default Printer on a Mac
Mac uses a single, consistent method regardless of macOS version, which makes it simpler than Windows in this one respect. Open System Settings, then click Printers & Scanners in the sidebar.
Near the bottom of the printer list, you will find a dropdown menu labeled Default printer. Click it and choose the printer you want to use automatically. Unlike Windows, macOS does not have a separate “automatic management” feature fighting your choice, so once you select a printer here, it stays your default until you change it again.
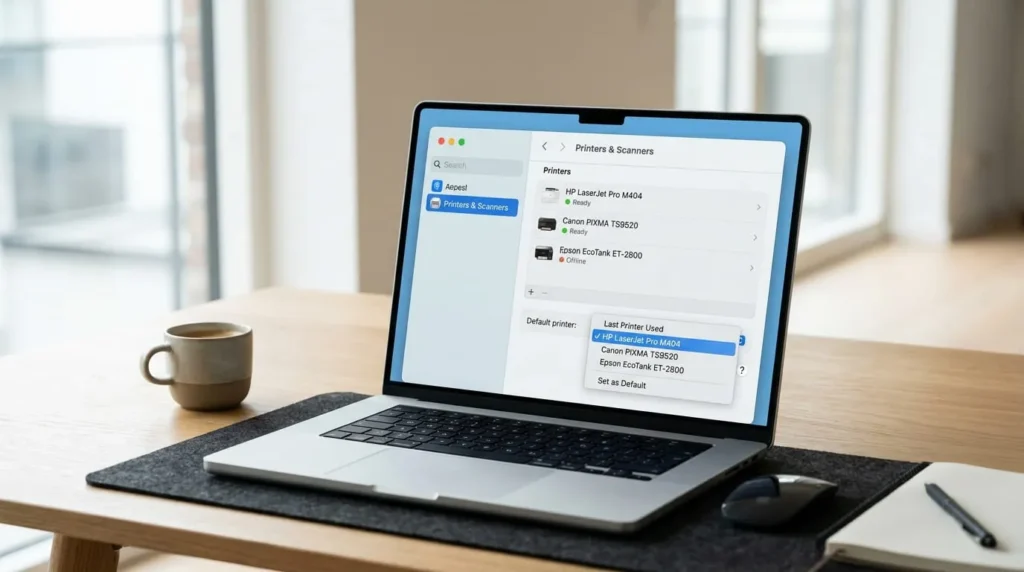
There is also a “Last Printer Used” option in that same dropdown. Selecting it recreates the same auto-switching behavior Windows offers, where your Mac defaults to whatever you printed to most recently. Choose a specific printer instead if you want a fixed, predictable default.
Setting a Default Printer with Command Prompt
If you manage multiple PCs, or you just prefer scripting over clicking through menus, Windows lets you set the default printer from the command line. Open Command Prompt or Windows Terminal and run the following, replacing the sample name with your printer’s exact name as it appears in Printers & Scanners:
The printer name must match exactly, including any spaces or model numbers in parentheses. If you are not sure of the exact name, open Printers & Scanners first and copy it directly from the list. This method is especially useful for IT administrators pushing the same configuration across several machines through a script rather than walking to each desk individually.
What to Do When You Can’t Change the Default Printer
Occasionally the standard steps do not work as expected. Here are the two most common snags and how to clear them.
The Set as Default Button Stays Greyed Out
This almost always means Let Windows manage my default printer, or its Windows 10 equivalent, is still turned on. Go back into Printers & scanners and confirm that toggle or checkbox is switched off. If it appears off but the button is still unresponsive, restart the Print Spooler service by opening Services (search for it in the Start menu), finding Print Spooler in the list, right-clicking it, and selecting Restart.
Your Printer Isn’t Showing Up in the List
If the printer you want to set as default is missing entirely, it may be disconnected, powered off, or removed from the network. Confirm the printer is on and connected to the same Wi-Fi network or USB port, then click Add device within Printers & scanners to have Windows search for it again. For network printers, the device sometimes gets a new IP address after a router restart, which can cause Windows to lose track of it until it is re-added.

Why Does My Default Printer Keep Changing on Its Own?
If your default printer resets itself after every reboot or every time you print to a different device, the cause is almost always the automatic management setting described earlier in this guide. Windows treats “most recently used” as the default whenever that toggle is on, which includes virtual printers like Microsoft Print to PDF or OneNote. Printing a single PDF can silently swap your default away from your physical printer.